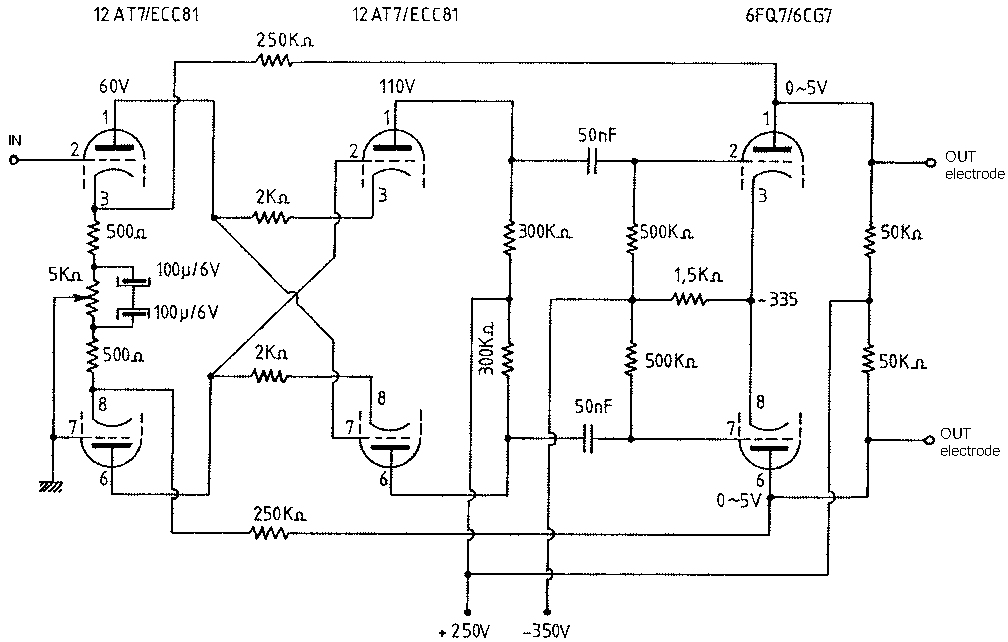
Some comments and mods regarding this amp from Giuseppe Nardelli:
First,
some general comments: I believe that this amp has been adapted by Stax with
EL34 in triode mode as power stages to obtain more power.
Stax sells this amp as a "reference" amp at the modest price of US$12'000
!!!
I must say that I've preferred to use true triodes instead of triode-connected pentodes. More than high-end considerations, the schematic as indicated above (or better, with 6SN7 tubes in the power stage as I realised it) has an output impedance that matches better with the "Pro" series Stax headphones compared with the pentodes.
The output power with the 6SN7 is sufficient as an integrated amplifier and we can use directly the line output of a preamp or directly the source (I've connected it directly to the output of my CD player).
There are some easy mods that are worth to be mentionned:
1) use preferably 6SN7 tubes instead of the 6CG7. They
are nearly identical but the former accept a higher plate voltage (350V between
cathode and plate are not very conservative for the 6CG7).
The 6SN7 are also slightly more powerful, the best choice being the 6SN7WGT (A
or B), the "W" indicating a higher plate voltage.
DO NOT use 5692, which are sonically very good but couldn't accept the 350V on
the plate.
2)
the coupling caps values are a bit low on this schematic.
To keep a similar lower cutoff frequency as the decoupling cathodes caps of the
first stage, I've used 0.22uF paper-in-oil and copper electrodes caps from Audio
Note.
3)
power supply, not indicated on the schematic. I realised 3 separated power
supplies:
+250V stabilised and
variable between 200 and 300V
-350V NOT stabilised
+580V not stabilised, for biasing the headphone
For the first two, 40mA are enough and for the third, a very low current
(5-10mA) is sufficient as it is used only to bias the headphones.
Those who have the common Stax (bias of 280V) can use directly the first supply
with 250V 40mA.
Pay attention to the output of the 580V, before going to the headphone, it is advised to insert a 20-30 Mega Ohms that provides no voltage drop as no current is flowing through but which could save the headphone, the ears and perhaps the audiophile himself in case of problems with the supply or the headphone.
To adjust correctly the amp, a variable supply of 250V is needed (in my case adjusted to 230V) not to adjust the first stage ( the trimmer does it), but to obtain 0V at the plates of the output stage. It is crucial to use 6SN7 tubes with half sections very similar (voltages below 10-15V are acceptable).
The 250V power supply filtering is also crucial, do not save on the number and quality of the filtering C-R-C (cap-resistor-cap) or C-L-C (cap-choke-cap) cells. I've used 4 C-R-C sections (resistors are acceptable as currents are pretty low), the first cell uses paper-in-oil caps and the last one Cerafine electrolytics (not bypassed).
Stabilisation ( very simple solid-state type: 2 transistors & some zeners) is included between the second and third cells (whatever stabilised supply described on your site is fine, even the simplest).
Filaments
power supplies.
For the final stage, it's compulsory to set it at -350V.
Personnally, I set them at the cathodes potential (always with a voltage divider,
I set those of the intermediate stage at +60V) but it's probably not necessary.
These supplies are DC but it's also probably a luxury.
Here are the mods, mainly 2, pretty simple but important:
a) considring the circuit topology and with a nearly
zero cost, it is possible to obtain a balanced input for those who have a source
of this type (CD, preamp, ...). The only cost is a second potentiometer, that's
all.
The "hot" and "cold" branches are connected to each grid of
first stage tubes and ground stays on the cursor of the trimmer.
So, if the amp receives a balanced signal, everything proceeds balanced but if
one pole (hot or cold) is connected to ground, it works as in the original
schematic. Simple, isn't it ?
I've inserted volume potentiometers at the inputs (Alps Black Beauty) not
mentionned on the original schematic. If we do the mod for a balanced source, we
need 2 stereo pots because each pole, hot and cold, should be attenuated
similarly.
I did this mod although my CD player is not balanced as I already think to the
next one perhaps with such a balanced output. In this case, the cable should be
trifilar (2 wires + ground screen), at the CD player side, one of the internal
wires are connected to the ground screen and to the amp side, there is the
commom Cannon XLR plug.
b)
in the schematic, I don't like very much the two electrolytics between the two
cathodes of the first stage and connected - to -. It is correct to connect them
in this way as we obtain a virtual ground between them but it is better to
connect this virtual ground to the real one via a 100K resistor which would
increase their life.
Biasing is not changed as there is no DC flowing through the caps and this value
of 100K has been chosen so that the signal is not attenuated. I used 2 FK serie
Black Gate for the two caps.
Quality components have been used throughout the project and, beside the already mentionned Black Gate, Audio Note and Cerafine caps, I've used tantalum resistors for the signal path and feedback loop and Riken Ohm for all the other resistors.
Last
comment regarding the adjustments which can be done statically or dynamically.
In the case of a balanced design, both branch are similar but in an unbalanced
design, it is better to adjust the trimmer so that the "lower" branch
has a slightly higher voltage. In this way, the amp is adjusted for DC but also
for AC.
With a sinusoidal generator and oscilloscope, it is pretty easy to adjust the
trimmer so that each branch of the final stage input receives a signal in phase
opposition but identical amplitude.
As
you can imagine, the bandwidth without an output transformer is very large.
The voltages at the output tubes plates reach a maximum of 300-400V peak to peak
at saturation. For a normal listening level, the peak to peak voltages reach
200-250V.
So, not a lot more to say except that the results are absolutely impressive especially combined with the 5 to 50'000Hz bandwidth of the Stax Pro !